Showing posts with label polish. Show all posts

Monday, May 20, 2013

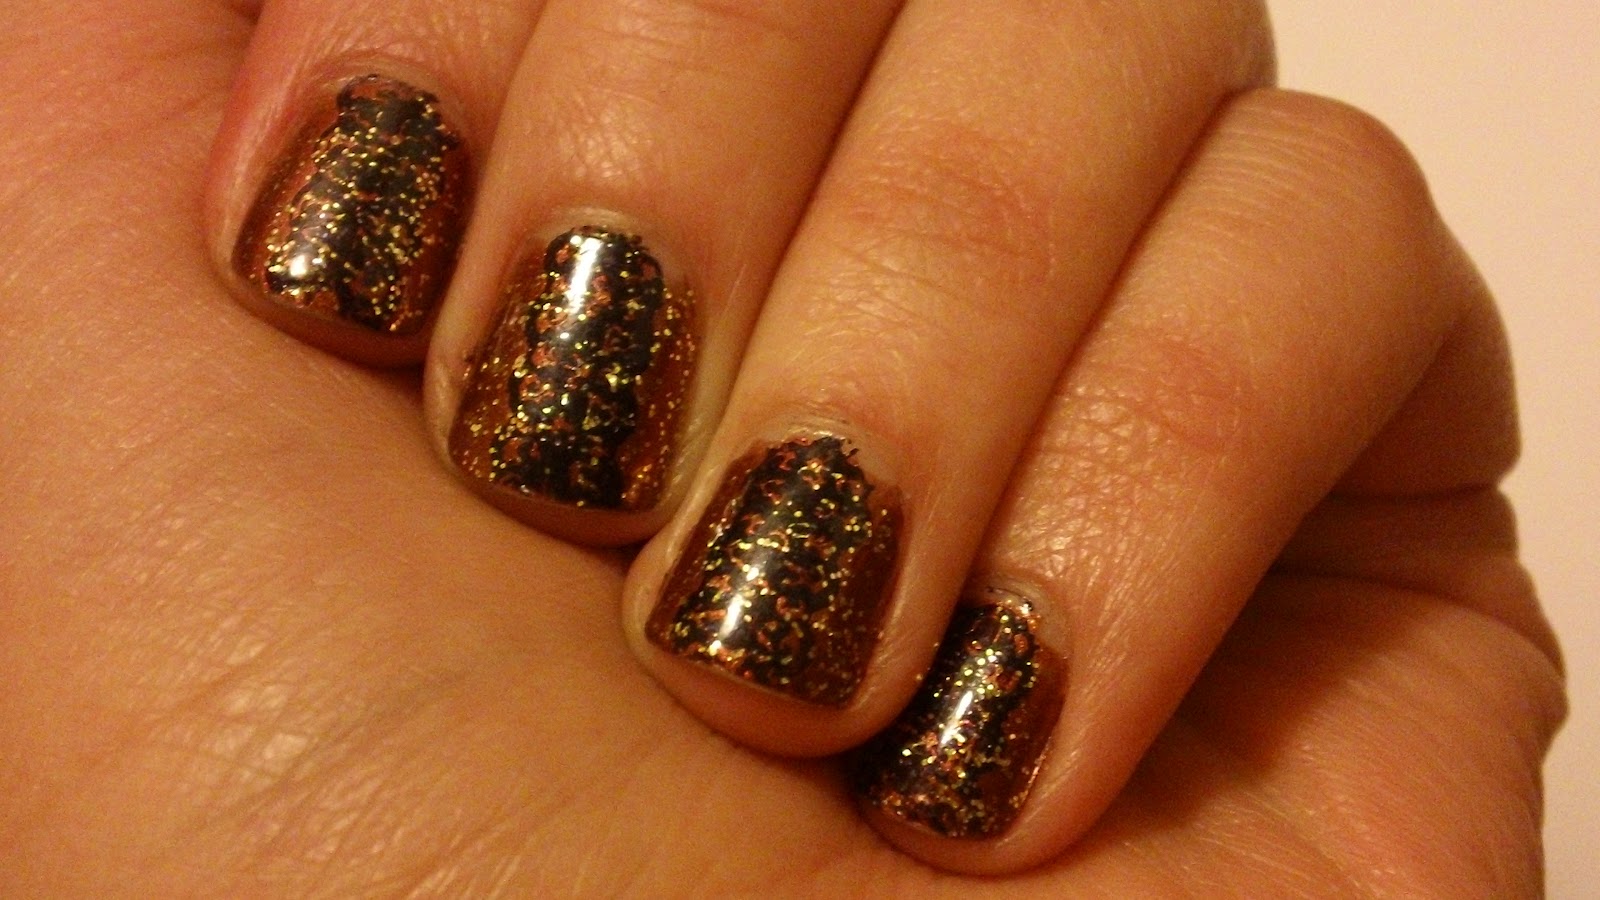
Oil Slick water marble

Finally a nail post after.....well way too long! I have been polishing my nails, just not posting about it.

For this marble I used Sally Hansen Black Tie and Scarab, as well as Orly Space Cadet  over a plain ol' black base (Wet and Wild Black Creme).
Take a look!


Of course, it looks better in real life....i picked some of the worst polishes to photograph. Trying out a new thumbnail shape also. I think I like it, but not sure yet......it almost looks fake (and I'm not sure how I feel about that).

Well SWAP 2013 has been submitted. Those pictures will be next on the blog.
Until next time!
-Lynnette

Tuesday, May 22, 2012

Week 21: Fruit

At first I was a bit stumped as to how to use fruit as a theme. I really didn't want to use stamping plate. I really only have grapes and strawberries for stamping, but on top of that it feels like cheating to do so much stamping. So I came up with an abstract way to do cherries.
I used Sally Hansen Rapid Red, my black nail art striper and black nail art pen. Quick, easy, effective!
Up next, another sewing post!
-Lynnette

Tuesday, May 1, 2012

Gray by Gray days

This is in honor of all the gray days we've been having here lately. However, things are supposed to be getting warmer and sunnier!
This is 2 coats of Sally Hansen Gray by Gray, stamped with Orly Rage.

This turned out really pretty! Very proud of these nails! I happen to be holding the piece of silk that will one day be a top. I thought it went pretty well with this mani.
Until next time!
-Lynnette

Thursday, April 12, 2012

Sally Hansen Plum Burst and Purple Pizzazz

Ok, so here's a proper mani to make up for that abomination I showed you before. Nothing terribly fancy, just a nice free handed side-swipe. I used Sally Hansen Plum Burst for the main color, then side-swiped with Purple Pizzazz.
These polishes were in a 2 pack at the dollar store.....can't pass up 2 polishes for a $1! I think that they are older polishes though and may not be big-3 free, but that doesn't bother me.

Still not unpacked.....packing always goes faster than unpacking. I think because with packing we give ourselves a deadline that we have to meet, then get frustrated and throw it all in boxes/bags. With unpacking there is no such deadline; we just slowly find things as we need them and put them where they go after.
Don't worry, there will be house pictures as soon as it's presentable!
-Lynnette

Friday, March 16, 2012

Nabi Magnetic in Black Berry

After the skittles came off, I decided to try out the magnetic polishes I picked up from Walgreens. I grabbed 2 colors, Black Berry and Red (and I may be going back for the Wine color.....love the way it looks on Scrangie's blog) one with the diagonal lines magnet, the other with the chevron.

I had a TERRIBLE time with this polish. I did 2 coats, using the magnet on the second coat (I probably could have done just one, but I didn't want to rely on that for opacity and the magnetic design). It stunk to high heaven, and I think it still smelled after my topcoat dried. On top of that, i couldn't get the magnets to pull the design on my whole nail. Not sure if my nails are more curved than others, or if the polish and/or the magnets just suck. The mani turned out pretty though....

I ended up using the magnet from my Icing polish, and doing only half of my nail at a time. My proceedure went like this: Basecoat and one coat of color for all nails, then a medium coat on one half of my nail followed by the magnet, then the other half of my nail. It was a PITA. Then clean up was a bit excessive because the polish liked to run everywhere (not to mention that I had to redo several nails). Here's how bad the acetone was after clean up:
Eeek! At least it didn't stain! Thank goodness for basecoat.
Until next time!
-Lynnette

Tuesday, March 6, 2012

Week 10: Polka Dots!

Hello there! Another challenge mani to show you, and this one I really loved! I wish it had stayed more than 3 days, but that's life. For this one I used 2 coats of China Glaze Sweet Hook, a lovely sweet creme. Nice and thick, but still manageable and easy to apply. Then for the polka dots I used Julep Charlotte and the end of a small paint brush.
Charlotte tended to make Sweet Hook look more pink, but I think they looked great together and I got a few compliments :)

Well, next on the agenda is to show you the nail mail I got late last week!
-Lynnette

Wednesday, February 29, 2012

Icing Lemme See Your Peacock and Revlon Scandalous

First, I want to show you the swatches of Icings Lemme See Your Peacock. It's a nice green, cyan and magenta glitter in a clear base.
One coat

Two coats

Three coats

Four Coats

I think this built up fairly nicely. By coats three and four I was sort of placing the glitter where I needed it for coverage. This also looked more opaque in real life, and the nail beneath was harder to see (I'm going with the glitter distracts your eyes). I didn't topcoat the swatch, so I'm not sure how much of that you would need to get it smooth.....

Now, here's what I currently have on my nails; a jelly sandwich of sorts using Revlon Scandalous (the re-release of the dupe for Lippman's Bad Romance I think......I got it because I like it lol) and Icing Peacock. I wanted something darker to tone down Peacock, but the blacks that I have are pretty opaque. So I grabbed Scandalous because it has the same magenta glitter in a watery black base.
Taken in the weak daylight of winter in Michigan :(


I kinda like it.....though I might do one more coat of topcoat (it's still a bit bumpy). However that will come tomorrow so that this has plenty of time to dry.

Until next time!
-Lynnette

Monday, February 27, 2012

Week 9: "Vintage" mani

Well I kinda cheated on this one, but I've got a good story! This week I used a "vintage" color in more than one sense. Not only is this a great old school red, but this is the red that my mom used all. the. time. when I was growing up. If I was a good girl, Mom would paint my nails, usually with this color. Revlon still makes this color under the same name, Cherries in the Snow. I picked up both of us a new bottle not too long ago.

This is a bit hard to capture on camera. In one light it looks tomato red, in other lights it's blue based, then other times it looks so pink it's red. This is the more tomato look here.

I know, I should have done something more, like half moons again or something. However, I really didn't like them when I did it the first time. Besides, me and this color have a history :).
Until next time!
-Lynnette

Tuesday, February 21, 2012

Water Marble!

So my friend Tasha saw another friend's water marble on Facebook and asked me to do one for her. Unfortunately I don't have a good picture of hers, but I decided to do one for myself. I liked the colors used in Tasha's marble, so I used the same colors but added one. Originally I used Ulta Jaded and Sally Hansen Flirt, then added Sally Hansen Black Tie for mine. It took a little while to get a bulls-eye that I liked, but the nails I dipped before the "perfected" bulls-eye turned out good enough to keep.
 Left
 Right
Left thumb.

I can't get the picture of my right thumb to co-operate, but it tuned out well. 
That's it for now; Later!
-Lynnette

Sunday, February 19, 2012

Week 8: Corset mani

This week I used 3 polished from my recent haul. I started with 2 coats of Ulta Maine Attraction, then did a coat of Julep Megan. Originally I was only going to do Megan on the sides and have Maine Attraction be the middle, but the two looked so close together that it would almost defeat the purpose. So I did a stripe of Marisa down the middle, then used my silver nail art stripper to do the crisscross. I didn't think a bow would turn out well so I omitted it.
Please excuse the tip wear....I did this Friday night, but it's worn well :).
Well, later!
-Lynnette

Thursday, February 16, 2012

China Glaze Blue Year's Eve and L.A. Colors Treasure Island

This is what I'm currently wearing. I used China Glaze's Blue Year's Eve as my base, 2 coats. This is a great polish by itself; nice glass flecks with some micro glitter mixed in I think. Then I put a coat of L.A. Colors Treasure Island on top. Treasure Island is green and blue micro glitter in a clear base...a glitter bomb itself, when put over Blue Year's Eve it's even more so! The two compliment each other really well, and aren't too distracting (like glitter can be).

Mmmm! Glittery goodness!
Well, that's all for now. Now to think of what my week 8 challenge will be!
-Lynnette

Valentine's Haul/Nail Mail

So my Valentine to myself was polish! I went out shopping at Icing and Ulta (which I didn't even know my area HAD and Ulta!), and while I was out my mail carrier brought me the two Julep boxes I was waiting on! So the nail part of my V-day was pretty great!
So here's everything I bought.
From Icing I picked up the grey/silver MagnetiX (with the wavy magnet) and Lemme See Your Peacock (clear base with cyan, green and magenta hex glitter).
Then From Ulta I bought (left to right): For Bitten, Jaded, Maine Attraction, and Lav-ish. Lav-ish came in a cute little makeup kit that was free when you bought $17.50 worth of Ulta brand products. The products in there actually aren't too bad, but I don't wear makeup a lot.

Then these were waiting for me when I got home:
 February Boho Glam box with (top to bottom) Julep's cuticle oil, Oscar, and Marisa. Marisa isn't as dark in person as it is in the picture.
January It Girl box with (top to bottom) Hayden, Leah, and Megan. These are actually the colors I was going to do my baby nursery in, then go lazy and didn't decorate lol.

If anyone is interested in joining Julep Maven for the first time, click here (it's my referral link) and use code SHAREONFEB to get your first Maven box for $1! Yup, only one dollar!
Well, that's the haul. There will be another post of what I'm currently wearing pretty soon.
-Lynnette

Tuesday, February 14, 2012

Week 7: Valentines Day.....rock star style!

Hello again! Late post again this week, but I thought I would post this challenge on the day it celebrates....Valentines day. I've never been a fan of V-Day for 2 reasons: 1) if you're single, this day is made to make you feel worse. 2) if you're with someone, this day is made to make you stress about getting the perfect gift/the best romantic surprise. The hubby and I will do something fun, but nothing over the top.

Without further ado.....this weeks mani uses Sally Hansen Unbreakable Heart as the red base (I remember this being a darker red when I first wore it around Christmas time, but here it's more cherry.....whatever). Then I used Sally Hansen Flirt for some subtle little hearts (so subtle I'm not sure you can see them in my pics....but they are there!), and Julep Elizabeth to stamp the heart with wings. Add some sweet stickers to my thumbs and middle fingers, and dab heart glitter on ring and index (from Nicole by OPI Step to the Beat of my Heart), topcoat and done!


And here's proof that I do sew! I made these super wide leg knit pants to accommodate a new thigh tattoo. All the pants I own happen to have side seams that rub and hurt the fresh (as of Saturday) tattoo. The one pair of bottoms I have without a side seam happen to be skin tight leggings....... not good for a fresh wound that needs air to heal.
I used a simple P.J. pant pattern that didn't have a side seam (Simplicity 2290 I think). I lowered the waist (now that they are made, I could have lowered it more....) and cut the leg pretty much straight down from the hip. Sew according to the directions, and voila! Thigh tattoo friendly pants! Now this is a picture of the "wrong" side/inside.....the other side is black. since the skull print hides the minimal seams and the elastic is enclosed, I treat these as reversible (I'll wear the black side out in public most likely).

Since the sewing machine is un-buried and the child has decided to nap, i might go sew up another pair......this time denim?

Later!
-Lynnette

Wednesday, February 8, 2012

Julep Rachel

So this is what I put on after my challenge mani came off. I used 2 (careful) coats of Julep Rachel as a base; a lovely copper color). I do want to mention that part of what made the week 6 challenge more challenging is I was not careful enough with Julep Elizabeth. When that was dry, I stamped a lacy design with Julep Elizabeth, then added a coat of Julep Oscar. I wanted the stamping to stand out better, so after Oscar dried I did another stamping round with Elizabeth. I did use two different plates/designs (which of course I don't remember!), but they meshed really well together.


Next to each other in the bottle (and in my mind's eye) I thought theses would be more eye catching. On the nail however, they turned out to be a little......blah? I don't know, what do you guys think? I will say that Oscar with a coat of topcoat is lovely and smooth; no grit, no texture other than smooth!

Well until next mani!
-Lynnette

Tuesday, February 7, 2012

Week 6: Half moon mani and my Julep box!

I was so excited to see/receive my Julep It Girl box, I had to use at least one of the polishes inside for my weekly challenge. If you've never heard of Julep, they make you take a style quiz, then send you a monthly box with polishes and products based on your style profile. Click here to go to Julep's website (it's also my referral link). This month's box came with Oscar (gold glitter), Rachel (warm copper), and Elizabeth (midnight purple; the website says blue, but it's purple in all lighting). I've actually got a lemming for the box they first showed me;  Hayden (a peach), Leah (a leaf green) and Megan (Mediterranean aquamarine)...it's actually almost the colors I thought of for my baby nursery lol.

Anyway, week six is a half moon manicure. I used an OPI for the base color, I don't know the color name. It's labeled "Be a Dahlia wont You", but if you google search it that color is actually a bright pink.....nothing close to what this color is. Since I found this polish in the parking lot of a store that doesn't even sell OPI, I can't really go back to the store and ask them......If anyone is game to helping me figure out the real name of this beauty, I'd gladly snail-mail them a swatch! Then I used scotch tape to tape off the bottom portion (most how-to's say to use a circular sticker, but I had nothing close to that), and did one coat of Elizabeth.
This is how it looked in most lighting.....nude shimmer with black. Elizabeth is gorgeous, but very very dark. Was a bit disappointed with how this wore. I do my manicures before bed, and somehow got tip wear in my sleep....not cool! Then got more chips at work the following day. I retipped and topcoated that night, but the next day there was even more chipping.
So Monday night I caved and took it off and put on what I'm currently waiting. That will get it's own post soon :)

Again, if you want more info about Julep's Maven program click here (it's also my referral link). I believe that if you use code "NEWYEAR2012" you can get your first box for only a penny! Yup one cent! (If that code doesn't work, I believe Julep also e-mails you a code to get your first box for only $5....I just don't remember the code or if mine would work for others)

Until next time!
-Lynnette

Saturday, February 4, 2012

Sally Hansen Black tie

I'm getting later and later in posting my manis.....I've gone from posting while the color was/is drying to the color being almost all chipped off! oops! Sorry. In an effort to do better, I'm forcing to post this before I try out my new Julep Maven polishes for my 52 week challenge.......ugh, this will have to be quick because they are calling my name!

I did Sally Hansen's Black Tie on Wednesday night (after the newspaper came off. I didn't have to remove much....most of it chipped/peeled like normal polish). This is my first duochrome and i love it! I would describe the color as a dark graphite grey that flashes plum purple and dark hunter green. My pictures don't capture all the colors right, but you can get the feel. It's not as flashy as a lot of duos are, and I like that. I have to wear a hunter green work shirt, and I felt like this coordinated but wasn't matchy, and wasn't too out of place. Neither of my jobs have anything about nail polish in the dress codes, but I like to feel pulled together; there's nothing that makes me feel more disjointed than polish clashing with what I'm wearing.
You can see a smidge of the green in this photo.

This color wore beautifully by itself for about 2 days, then I decided to  refresh it with a crackle coat (I still happen to l.o.v.e. crackle polish lol). I wanted to see what would happen to the color of the crackle/if the duochrome would show through. Sadly, it didn't show much if at all. This is a medium coat of Oxidized Aqua by China Glaze.
Black Tie sadly just looks dark blue/purple under the crackle coat :(. I wore it this way for about another day and a half (it didn't start chipping until today). Looks like with this base/top coat combo i can go from Saturday night to Wednesday, then Wednesday night back to Saturday. This is great for me. While i enjoy painting my nails, I don't have tons of time lying around. Also this way I actually get to enjoy my manis....right up till the time that I get sick of them lol!

Well off to paint again.....next challenge: half moon manicure!
-Lynnette

Tuesday, January 31, 2012

Week 5: Newspaper fail and win

Hello, sorry this is late. I actually did this Saturday night, but didn't get pictures/time to post it until now.
     So i'm not sure how everyone gets great results doing newspaper manis....mine sucked! I planned to do QR codes (you know those things for smart phones) and barcodes on all my nails. However, the newsprint only transferred on 3 of my nails......fail. So i took little pieces of the paper (it just so happens I was using a flyer with my name printed on it) and stuck them into my still tacky topcoat, then did 2 more coats of topcoat. Now when I say "stuck them into my tacky topcoat", I mean that I literally used my other nails/a pen cap to sink it into the polish as much as possible, focusing on the edges. That way, when i did my subsequent coats of topcoat, it leveled out nicely. The smoothest one is my middle right; my pinkies still have a ridge on one side but it's not enough to bug me.
This is the left hand.
This is the right hand.

This is 2 1/2 days of wear, so please excuse the tip wear! I used my Sally Hansen base coat, 2 coats of Revlon Timeless (I picked this up with my newspaper mani in mind lol), and a coat of Sally Hansen on all nails, plus another coat on the nails with paper stuck on them. Not sure how removal will go, but we'll cross that bridge when we come to it eh?

     A quick note about the Sally Hansen Continuous Treatment base and topcoat....This is great as a base coat. Keeps your manis looking great for days. Since I started using it, I've yet to have a mani chip before i was tired of it.....the same could be said for my Orly Bonder. However, the Sally Hansen hasn't destroyed my nails. I have used it as a topcoat, and it works well, but I'll stick to my Out the Door Quick dry. I'm usually doing my nails before bed, and I just don't have the time to wait for the Sally's to completely dry (it takes FOREVER).

Anyway, time to take the baby to the doctor, six month check up today!
-Lynnette

Thursday, January 26, 2012

Matte Whimsy

I decided to try Whimsical matte. I think the matte topcoat made it a smidge dusty/lighter, which i actually like better. I think the franken i used under Whimsical was a little dark.

The photo makes my hands look a little weird, but the polish is the most color accurate in this one.

Wednesday, January 25, 2012

Revlon Whimsical and Fingerpaints Brushstroke Blush

Hello again! The plaid didn't last long lol. The poor polish didn't stand a chance with all the cleaning i did!
The manis i'm going to show you needs a little back story: I have horrible knees. We're talking 2 dislocations of my left knee cap, and tendinitis in both all about 2 years apart; all resulting in physical therapy. I'm pretty in-tune with what's going on with them. So when i recently started having knee pain in my right knee, i had an idea what might make it feel better. It felt like the muscles in there were too tight; bending was like stretching a tight rubber band even tighter. Enter my best friend Hannah. She's a massage/occupational therapist, and agreed to give me a rub down and i did her nail in return! I feel much better; not perfect, but much better.
This is 2 coats of Revlon Whimsical over a light blue franken i made (it's a whole bottle of a Sally's mini white and dark royal blue, plus a shimmery white mineral eye shadow). The franken made Whimsical more blue; i think next time i'll try it over white and see the difference. This time i used Sally Hansen Continuous Treatment Base&Top coat for my base and top coats. This picture was taken before i went to bed and got sheet marks (and i just noticed my bad clean up job! eek!).
For Hannah, I did 3 coats of Fingerpaints Brushstroke Blush; it was good formula wise, but a bit sheer (hence 3 coats). Then we stamped the butterfly from Mash-18 with Sally Hansen Xtreme wear in Flirt. It stamped over the pink quite nicely. Next I placed one of the hearts from Nicole by OPI's Step 2 the Beat of my <3. On Hannah I used my INM Out the Door quick dry topcoat (since it was getting late, and she needed to dash out the door lol). It turned out very sweet and spring-like!

I think i might try my Whimsical mani matte in the near future. If i do, i'll post a pic!
See you later!
-Lynnette

Sunday, January 22, 2012

Week 4, Plaid mani

This prolly would have looked better on longer nails. However, due to my recent basecoat issues, I've had to trim them.....again. So instead of using my Orly Bonder, i used Sinful Colors clear (I think that it's supposed to be a topcoat). I was feeling like warm colors, so i picked out Sinful Colors Rich in Heart a lovely warm brown with a little bit of red shimmer. Then i used my gold glitter stripper (Art deco by L.A. colors) to create what i call a "mini plaid". I wish that i had a metallic gold stripper in my arsenal, i would have been able to get thinner lines......another thing that would have made this mani would be copper and gold stripes.

Anyway, i wore this shiny for a little while when out with my mom. While out at Hot Topic, i found out that they carry matte topcoat (Warpaint Beauty is the brand, their house brand i think)!! For only $4!!! So i nabbed it up, and put it on this mani for a little extra something.

You get pictures of my right hand this time because it looks better than my left!


Until next time!
-Lynnette